MAKING SHNS FOR BIT TORRENT DISTRIBUTION
You're going to need a few tools to make the conversion from the CDs
you have to the SHNs everybody wants. First tool is Exact Audio Copy, or
EAC. EAC can be found here:
http://www.exactaudiocopy.de. The second tool is MKWACT, which can be
found here:
http://home.att.net/~mkw/mkwact.html. Being the first time using the
software, you'll need to spend a few minutes configuring EAC. This may
seem excessive, but it's a one-time process which you'll never have to
repeat. Everybody's settings will be different, but one of the constants
during the install should be selecting the expert/advanced settings when
installing. Failing to do this will leave a number of advanced options
hidden that you'll need to access in a bit. Once EAC is installed, you'll
need to set up your options. Either press F9, or go to EAC>EAC Options.
Two tabs are important in this window. Those are Normalize and
Filename. Confirm that "Normalize" is UNCHECKED, and move over
to the Filename tab. In the "Naming scheme" textbox, enter the following
text exactly as it appears, with no spaces:
%C.shnf\%Cd%D\%Cd%Dt%N
Setting these switches will save you a lot
of time later.
Hit OK and close that box. Move on to EAC>Drive Options (or press F10). In
the first tab, Extraction Method, click the button that says
"Detect Read Features..." and let EAC check out your drive. This may take
a few moments. When it's done, click Apply and then OK to close that box.
EAC should automatically check which boxes resulted in "yes" responses
when detecting the read features under Secure Mode. Next, we'll
move to the third tab, Offset/Speed. First, find a CD you own from this list - if you don't own any of those CDs, use this list to find an approximate number (6th column from the left), then click the button that says "Detect read sample offset
correction." A number should appear in the box above it. If you need to use the approximate number, enter it manually. Make sure the
radio button for that option is checked, and hit OK at the bottom of that
window to close it.
At this point hit Shift+F2, or go to EAC>Profiles>Save Profile. Save this
as "shn profile." In the future, you may have an mp3 profile, and this is
the easiest way to move between the two instead of changing your
preferences each time.
*****
The above steps are a one-time process, as everything else will change
each time you rip a CD depending on which CD you're using. For examples
the rest of the way (and because it's the one show I have in arm's reach),
I'll be using the February 11, 2003 show as the example.
The extensive naming scheme I detailed above comes in handy at this point.
Remove whatever CD you used to set your offsets, and insert the first disc
of the PJ show you're going to rip. In the main EAC window, find the CD
Title text box, and enter pj2003-02-11. For CD Artist
enter 1. For the second disc, change the 1 to a (yes, you
guessed it) 2.
Next, hit F4, or go to Action>Detect Gaps. When EAC is done
detecting, go to Action>Append Gaps To Previous Track (default).
Now, hit Ctrl+A or go to Edit>Select All, then Action>Copy Selected
Tracks>Uncompressed.
EAC will now rip your CD. Secure Mode takes a while. How long, exactly,
depends on your drive's speed. I've heard everything from 10 to 40 minutes
per disc. This is necessary to ensure a perfect extraction, so be patient.
When EAC's finished, hit OK. A second window will pop up titled Status
and Error Messages. In this window, click the middle button at the
bottom that says Create Log. Save this file to the same location
the WAVs are being ripped to, then hit OK to close the Status and Error
Messages window.
Guess what? You're done. Now, repeat everything below the five asterisks
for disc two. Once you've finished both discs, it's time to move on to
turning them into SHNs.
First, let's configure MKWACT. Open the program, and go to Options>File
Options. Many of these options are up to you. For first-timers, I
recommend the following...
Click the "Same as input" button, click the "Generate MD5 checksums after
compressing" box, click the "Delete input files after lossless (MKW or
SHN) processing" box, and leave everything else unchecked. Click the Close
button.
Next, go to Options>Shorten. Select the bottom option, "Append seek
table to end of Shorten file." Hit close to exit to the main MKWACT
window.
If you're using Windows XP, and you get an error when attempting the next step, you'll have to make the following tweak to the program's settings. Go into the folder where mkwact.exe is kept. Right-click on the program, and go to Properties. Then, click on the "Compatibility" tab. Check the box for "Run this program in compatibility mode for:". From the drop-down menu, select either "Windows 98/Windows Me" or "Windows 2000." I have it set for 98/Me, though I know others have it set for 2000, and both work. Experiment with those options. Click Apply, then OK.
Now, open the windows folder which contains the WAVs for disc one, which
you ripped above. Select all the WAVs either with your mouse or by
clicking on the first WAV, holding down the Shift button, and then
selecting the last WAV. However you do it, make sure all the songs are
selected. Drag them over into the MKWACT window but BEFORE RELEASING
THE MOUSE BUTTON, press and hold down your Shift Key. With the
mouse anywhere inside the white box within MKWACT, now release the mouse
button, then release the Shift Key. MKWACT will begin to encode the
WAVs.
If you'd like, as MKWACT encodes the first disc, you can SHIFT-drag n drop
the WAVs for the second disc into the window. You do not need to wait
until disc one is finished to queue up disc two.
When MKWACT is finished with all files (it'll say "Done" at the bottom in
the status bar), close that window.
The final item you need to create is a text file. I've made a template
which can be grabbed here:
http://www.sidewalkcrusaders.com/bthowto/pjxxxx-xx-xx.txt. Make sure
to change all the placeholders, including the version numbers of EAC and
MKWACT (both found in the Help or About options of their respective
programs).
Using the naming scheme detailed above, you'll have folders with contents
something like the following:
|
"2003.04.13 Tampa
[shn]" is the GRANDFATHER FOLDER in the photos below. When making the
torrent file in the next page of the walkthrough, in this example,
"2003.04.13 Tampa [shn]" would be the folder you'd select in completedir. |
|
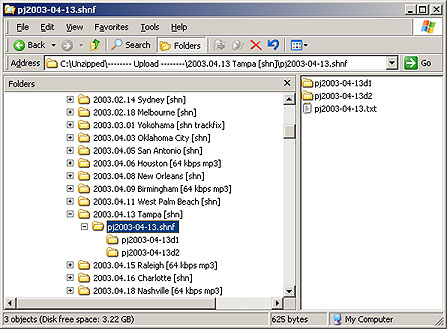
This is the view of the PARENT FOLDER. Note the txt file in the PARENT
FOLDER. |
|
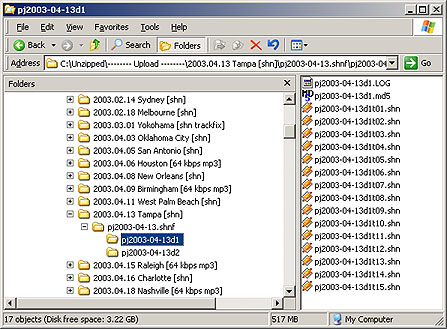
This is the view of the CHILD FOLDER. Note the log file, md5 file, and
shns in the CHILD FOLDER. |
Back to
the Main Page
|